Quickbooks to Salesforce Integration 2026
QuickBooks to Salesforce Integration brings a robust synergy between financial data and customer relationship management, revolutionizing how businesses manage their finances and customer interactions. This integration merges two powerful systems, harmonizing accounting functionalities from QuickBooks with Salesforce’s comprehensive CRM capabilities. By quickbooks salesforce integration, companies gain a holistic view of customer interactions, financial transactions, and sales data, streamlining operations and fostering better-informed decision-making processes. Salesforce Quickbooks Integration union not only enhances efficiency but also boosts productivity by minimizing manual data entry, offering a seamless experience across departments, from sales to finance.
QuickBooks Salesforce Integration combines Intuit QuickBooks Online with Salesforce CRM to eliminate manual data entry, synchronize financial transactions, and provide a 360° view of customers.
70%
Reduction in Manual Data Entry
3x
Faster Invoice Processing
100%
Real-Time Financial Sync
Whai is QuickBooks?
QuickBooks, developed by Intuit, is a leading accounting software used globally by SMEs. It handles everything from invoicing and payroll processing to expense tracking, tax preparation, bank reconciliation, and financial reporting.
- Automated invoicing & billing
- Payroll & tax management
- Expense tracking & reporting
- Inventory management
- Cloud + mobile accessibility
Benefits of QuickBooks Salesforce Integration
Automated WorkflowsTrigger invoices in QuickBooks directly from Salesforce events.
Time & Cost SavingsEliminate manual entry and reduce operational overhead.
Better ReportingCombine CRM + financial data for unified analytics.
Improved AccuracyReduce human errors across finance and sales data.
QuickBooks API Integration with Salesforce (Steps)
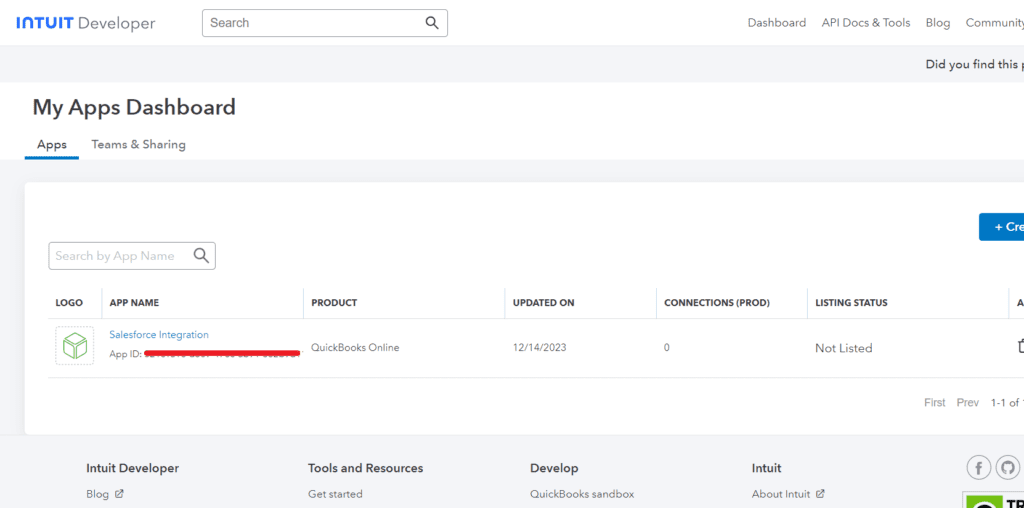
1. Create QuickBooks Developer Account
2. Create App in Intuit Developer Portal
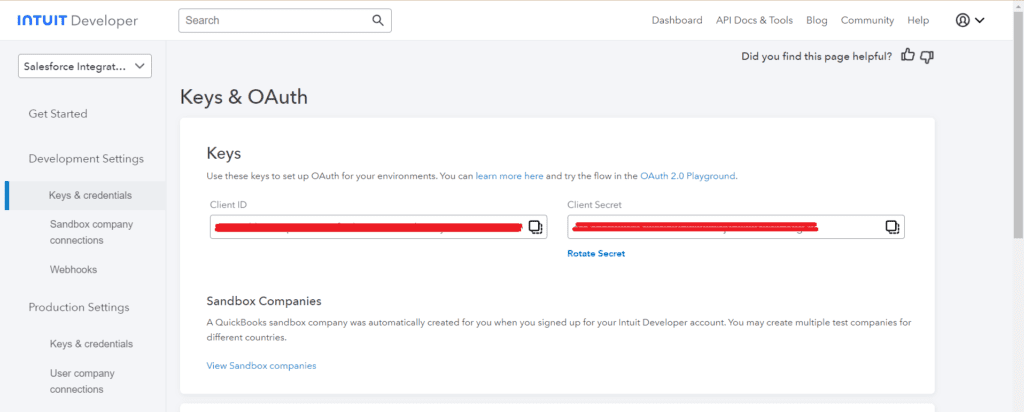
3. Copy Client ID & Client Secret
4. Login to salesforce account. Go to setup and search “Auth provider”
5. Add client id and client secret key received from Quickbook API.

6. After creating the Auth provider we will get an Endpoint url. Copy that url and add it to the App (we have to add that Endpoint URL to redirect URI in quickbook.)
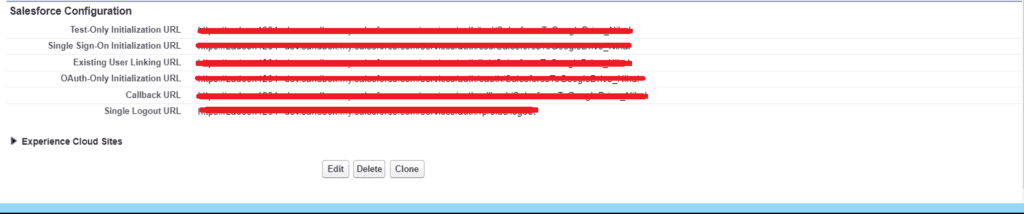
7. After getting the callback URL, we will add it to the Redirect URI of Quickbook.
8. Once we create an Auth provider, we move to “Named Credential” from the setup page.Here we have to fill in the following details:
-
- Add Endpoint URL and Identity Type as Named Principal.
- Select authentication protocol as OAuth 2.0.
- Add the authentication provider which we had created in the previous step.


9. After creating a named credential, we have to make sure that “Authentication Status” is set to “Authenticated”. Next, we will create a custom metadata where we store our endpoint URL.
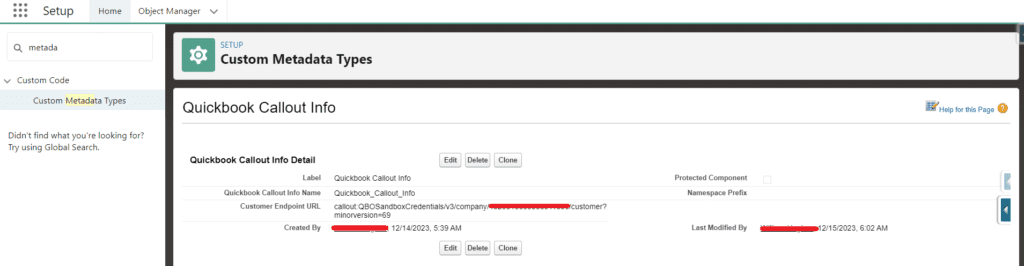
Retrieving the Company Id:
- Open Quickbooks sandbox. Click on the ‘Gear’ icon & then select ‘Additional Info’
- Add company id to the customer endpoint URL in Custom metadata.
10. Now we have to create Apex, From apex we will make a callout to Quickbook.
We need to set up the following configurations:
- Endpoint:‘callout:{Named_Credentail}/v3/company/{Company_Id}/invoice?minorversion=69’
- Header: Content-Type -> application/json
- Header: Accept -> application/json
- Method: POST
Apex Integration Code
public class IntegrationWithQuickbook {

    public static void createCustomer() {

        String requestBody = '{"DisplayName":"Test ABC"}';

        HttpRequest req = new HttpRequest();
        req.setEndpoint('callout:QB_NAMED_CRED/v3/company/ID/customer');
        req.setMethod('POST');
        req.setHeader('Content-Type','application/json');
        req.setBody(requestBody);

        Http http = new Http();
        HttpResponse res = http.send(req);

        System.debug(res.getBody());
    }
}
Postman Testing Flow
- Get Your OAuth 2.0 Tokens: Obtain OAuth 2.0 tokens (Client ID and Client Secret) from your QuickBooks app.
- Obtain Access Token:Set Up Postman Environment: Create a new environment in Postman and add the necessary variables:
- baseUrl: QuickBooks API base URL.
- clientId: Your QuickBooks app’s Client ID.
- clientSecret: Your QuickBooks app’s Client Secret.
- accessToken: Access token obtained from QuickBooks OAuth 2.0 authentication.
- refreshToken: Refresh token obtained from QuickBooks OAuth 2.0 authentication.
- Obtain Access Token: Make a POST request to QuickBooks OAuth 2.0 token endpoint using your Client ID, Client Secret, and authorization code to get the access token.
- Obtain Access Token:Set Up Postman Environment: Create a new environment in Postman and add the necessary variables:
- Make a POST request to QuickBooks OAuth 2.0 token endpoint using your Client ID, Client Secret, and authorization code to get the access token.
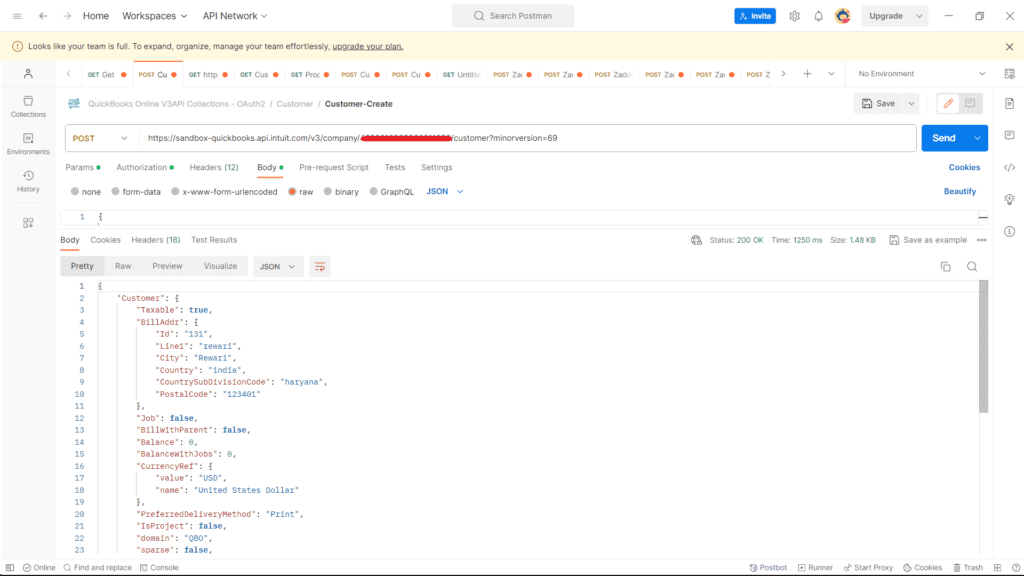
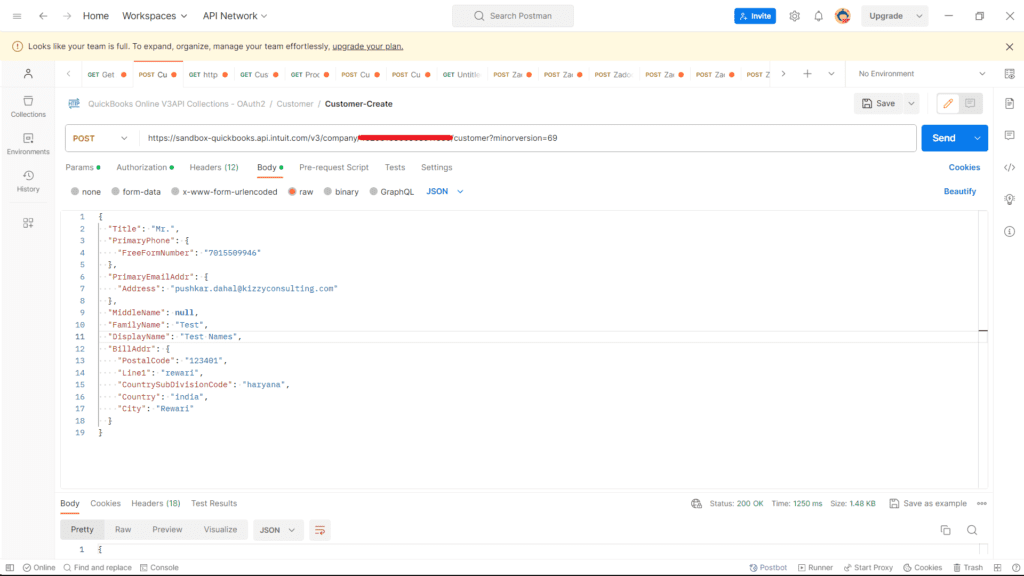
- Create a Customer:
Make a POST request to create a customer in QuickBooks using the obtained access token. Replace placeholders like {{baseUrl}}, {{clientId}}, {{clientSecret}}, {{accessToken}}, {{realmId}}, etc., with your actual values.
- Handle Response:
Handle the response from QuickBooks. If successful, you should receive a JSON response with the details of the created customer. Ensure you have the necessary scopes and permissions for customer creation based on your QuickBooks app settings. Adjust the request payload as needed for additional customer details.

Top Use Cases
- Auto invoice creation from Salesforce Opportunities
- Bidirectional customer sync
- Payment status tracking inside CRM
- Revenue reporting dashboards
- Automated financial alerts
Conclusion
QuickBooks Salesforce Integration improves operational efficiency, reduces manual work, and enables real-time financial visibility across sales and finance teams using secure API-driven architecture.
Need Help with Integration?
Kizzy Consulting builds enterprise-grade Salesforce + QuickBooks integrations using secure OAuth 2.0 and Apex APIs.